

Google has just released a new Gmail layout, including some hidden features that many users may not even be aware of. From hidden keyboard shortcuts to creating filters and labels, there are many tricks to make your email experience easier and more efficient.
These are just some of the great new features in the new Gmail layout. So if you haven’t switched to the new format yet, now is the perfect time to do so!
1. Keyboard shortcuts you can use to speed up your workflow
You can use a few keyboard shortcuts to speed up your workflow in the new Gmail layout:
- To open a new window, press Ctrl+N.
- To close the current window, press Ctrl+W.
- To move between windows, press Alt+Tab.
- To open the search bar, press Ctrl+F.
- To refresh your inbox, press Ctrl+R.
- To open the settings menu, press Alt+S.
- Lastly, to compose a new email, press Ctrl+Shift+C.
These are just a few of the keyboard shortcuts you can use in the new Gmail layout. Experiment and see which ones help you work faster and more efficiently. And don’t forget, you can always access the complete list of keyboard shortcuts by pressing Ctrl+?.
2. Clean up your inbox with these three easy steps
The new Gmail layout offers several features and tools to help you clean up your inbox and manage your messages more effectively. By following these five easy steps, you can get your inbox under control and keep it that way:
- Use the search bar
The search bar is one of the most powerful tools in Gmail, and it can be used to find any message in your inbox quickly. You can even use advanced search operators to narrow down your results. - Use the priority inbox
The priority inbox is a great way to focus on the most important messages in your inbox. Gmail will automatically prioritize messages based on who you typically communicate with and how often you receive messages from a particular sender. - Use multiple inboxes
If you have a lot of email accounts, you can use multiple inboxes to help keep them organized. Multiple inboxes let you view messages from multiple accounts in a single window. You can even set up filters to automatically route messages from specific senders into the appropriate inbox.
3. How to set up filters and labels in Gmail
Creating a Gmail filter and then a Gmail label is a horrendously long task, however you can now auto label your emails in seconds using Gmail Auto Label by cloudHQ (it’s free).
Automatically Gmail label emails from any email recipient or domain with Gmail Auto Label

Get Gmail Auto Label
For step-by-step instructions, just visit this recent blog post.
Otherwise, if you prefer to do it in the old fashioned method to set up Gmail labels and Gmail filters (that might take you awhile), you can always follow these steps:
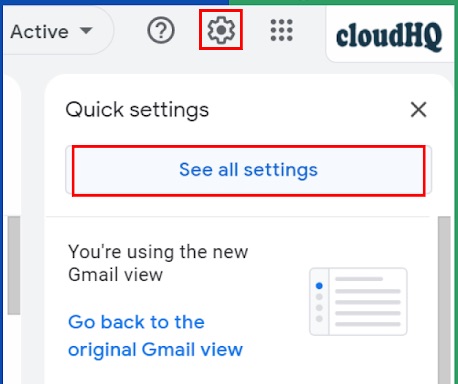
- Click the gear icon in the top right corner of the screen and select “Settings”, then click “more settings”
- Select the “Filters and Blocked Addresses” tab.
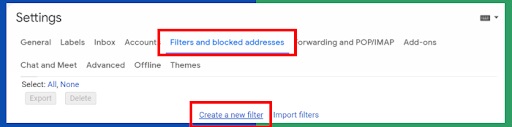
- Click “Create a new filter.”
- In the “Filter Criteria” box, enter the criteria for the filter. For example, you could filter emails from a particular email address or containing a specific keyword.
- In the “Action” box, select the action you want Gmail to take when it finds emails that match the criteria. You can have Gmail skip the inbox, apply a label, or take other actions.
- Click “Create filter.”


You can also use labels to organize your Gmail inbox. To create a new label:
- Click the gear icon in the top right corner of the screen and select “Settings.”
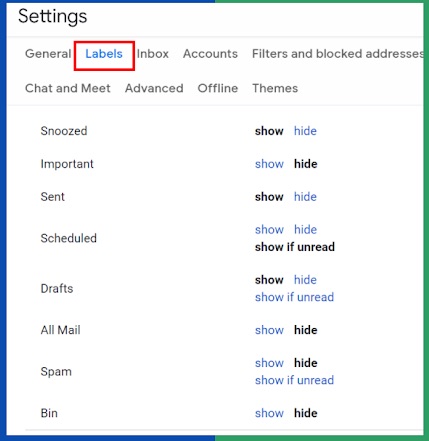
- Select the “Labels” tab.
- Scroll down and click “Create new label.”
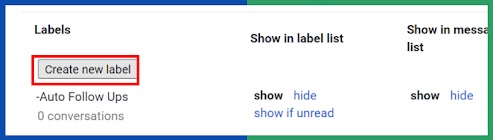
- Enter a name for the label and click “Create.”

- To apply the label to an email, open the email and click the “Label” button. Next, select the label you want to apply from the list.


4. How to archive emails for good
Some great hidden features in the new Gmail layout can help you archive emails for good.
First, you can use the “archive” button to archive an email. This will move the email out of your inbox and into the “archive” folder.

You can also use the “star” button to mark an email as a “starred” email. This will move the email to the “starred” folder.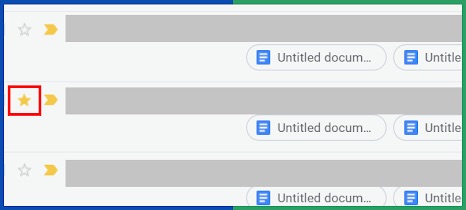

Finally, you can use the “delete” button to delete an email. This will delete the email from your inbox and move it to the “deleted items” folder.

These hidden features in the new Gmail layout can help you keep your inbox clean and organized.
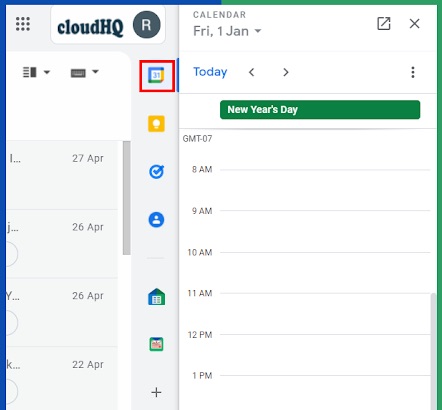
5. How to make use of Google Calendar and Tasks integrations

To enable Google Calendar integration, click on the “Settings” cog in the top right corner of your Gmail screen, and select “Settings”. Then, under the “General” tab, scroll down to the “Calendar” section and select the “Show Google Calendar button”. Finally, click “Save Changes”.
To enable Tasks integration, click on the “Settings” cog in the top right corner of your Gmail screen, and select “Settings”. Check the box next to the ” Show tasks button under the “Tasks” tab, check the box next to “Show tasks button”. Finally, click “Save Changes”.
Once you’ve enabled these integrations, you’ll see a Calendar and Tasks button in the top right corner of your Gmail screen. Clicking on either of these buttons will open up a new window where you can access your Google Calendar or manage your tasks.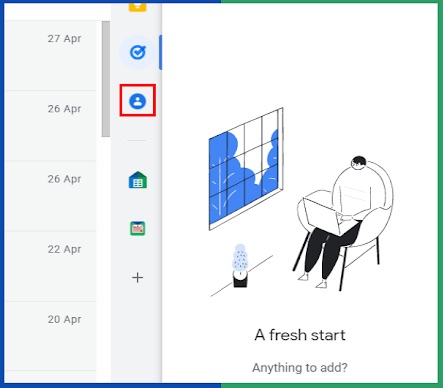

These hidden features in the new Gmail layout can help you stay organized and productive. So make sure to take advantage of them!
6. How to enable offline access to emails
If you’re looking for a way to enable offline access to your Gmail messages, follow these steps:
- In the top left corner of your Gmail window, click the settings gear icon.
- Select Settings from the menu that appears.
- Click the Offline tab in the Settings window.
- Check the box next to Enable offline mail.
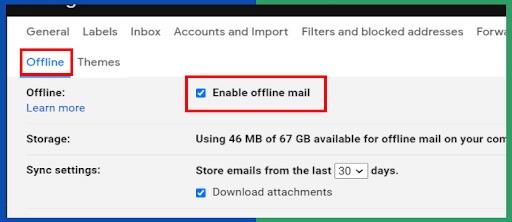
- Click Save Changes.

Now, when you’re offline, you’ll still be able to access your Gmail messages and compose new ones. Keep in mind that any changes you make will be synced with Gmail the next time you’re online.
7. Pause Gmail Inbox
One of the most incredible features is the ability to pause your inbox. This can be useful if you’re trying to focus on a task and don’t want email notifications distracting you. To enable this feature, go to the settings menu and select “pause Inbox.” You can choose how long you want to pause your inbox (from 0 to 24 hours) and decide which emails should be sent to your inbox. Know the step-by-step procedure and install Pause Gmail Inbox now!
Conclusion
The new Gmail layout is packed with features that make your email life more manageable. We’ve shown you how to use some of the hidden features in this article, but there are many more waiting to be discovered. With a bit of practice, you’ll be able to navigate the new layout like a pro and get more done in less time.