

Evernote is just one of those platforms that people love to hate, but always wind up using anyways because of the sheer amount of flexibility that it has to offer. Aside for Microsoft OneNote, it has no other competitors. In its simplest form, it’s a note-taking platform. In its most complex, it can be your lifeline. Let’s take a look at how to optimize its already strong features.
Storage limitations
Evernote touts that you have an “unlimited” amount of storage, but actually, that’s not quite true: You are limited on how much data you can upload. On the free plan, you’re limited to 60mb/month, Premium is up to 4GB/month, and Business is up to 2GB/month. Further, whether you have a paid account or not, you’re limited to a maximum of 250 notebooks. If you create a notebook for every client you have, which is a great way to organize your Evernote account btw, you might very well run into this notebook limit in no time. Here’s how we suggest to get around it:
- Set up two Evernote accounts – the second Evernote account will be one for your “archived” notebook. So if you close the deal, you can just delete the notebook.
- Use cloudHQ to sync from one account to the “archive” account: Start Here.
- Once you’ve signed in (if you haven’t already), go into the advanced options.
- De-select “replicate deletion” so that you when you delete a notebook on the first account, it won’t be deleted on the second. This forces the 2nd account to become your archive folder (or your closed clients folder), and the 1st Evernote account to become your active account (or your open clients folder).
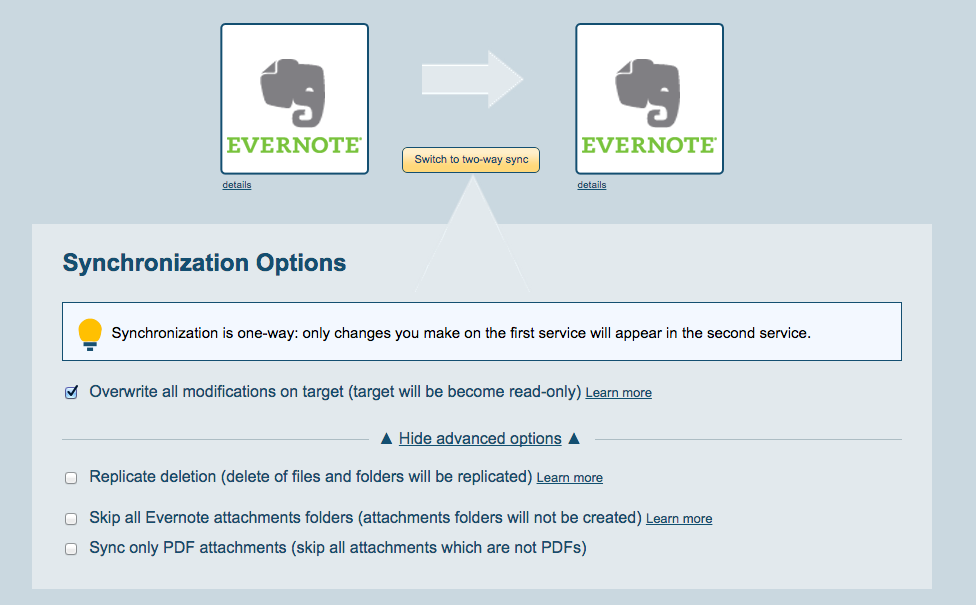
- This will give you a total 500 notebooks instead of 250.
- We found this for further reference on Evernote

Security
Too often, we’re busy sharing so many notes, but can’t actually tell which notes we’re sharing or more worrisome, with whom. There’s an option on Evernote’s desktop version that shows you who you’re sharing your notebooks with, but none for single notes. If your account gets hacked, you probably wouldn’t know unless you followed these simple instructions:
- Sign into Evernote.
- Search for: “share:*”
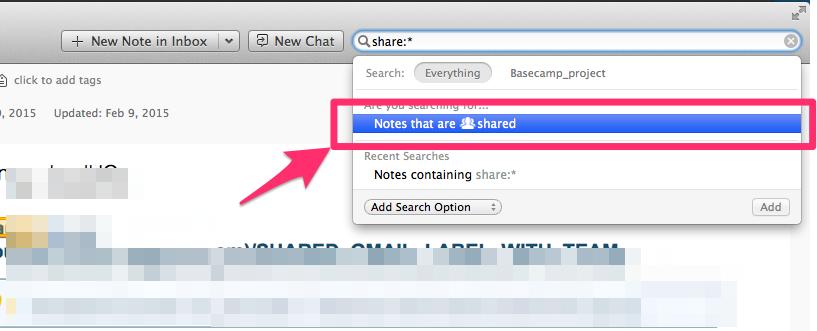
- You will get a list of all your notes that you’re sharing with others.

Sharing Your Notebook (Read Only or Read/Write)
Unfortunately, there are two Evernote sharing restrictions:
- You are unable to share a note in an editable format from Evernote with anyone else, whether they’re an Evernote user or not.
- You’re also unable to share a notebook as read-write with anyone who isn’t on Evernote.
The hack to get around it is actually not so hard. You can share a notebook, so, create a notebook and just put your note inside it. You can even label it “Shared with Jonathan”, so that you know which notebook it is. From here, you have three ways to share it:
- Method one (Evernote read-only or read/write):You can share your notebook with other Evernote users – as read-write or read-only. But to share a notebook as read/write you both need to be subscribers of either Evernote Premium or Business. Free users can share notebooks as read-only. IMPORTANT NOTE: If you delete a note from a shared notebook by an accident, the deleted note will not be your trash: it will be only in the trash of the person who created the notebook. To restore it you will need to contact the owner of this notebook and he/she will need to restore the note.
- Method two (cloudHQ read-only):You can use the “share” option via your cloudHQ account. The other user can open and view your notebook in any of their preferred apps (Google Drive, Dropbox, Gmail, etc.), including Evernote regardless of whether they have a free account or not. This is a good control option since you can share your Evernote notebook with colleagues or clients who do not use Evernote.
- Login to cloudHQ.
- Go to the share tab on the top right, or just click here.
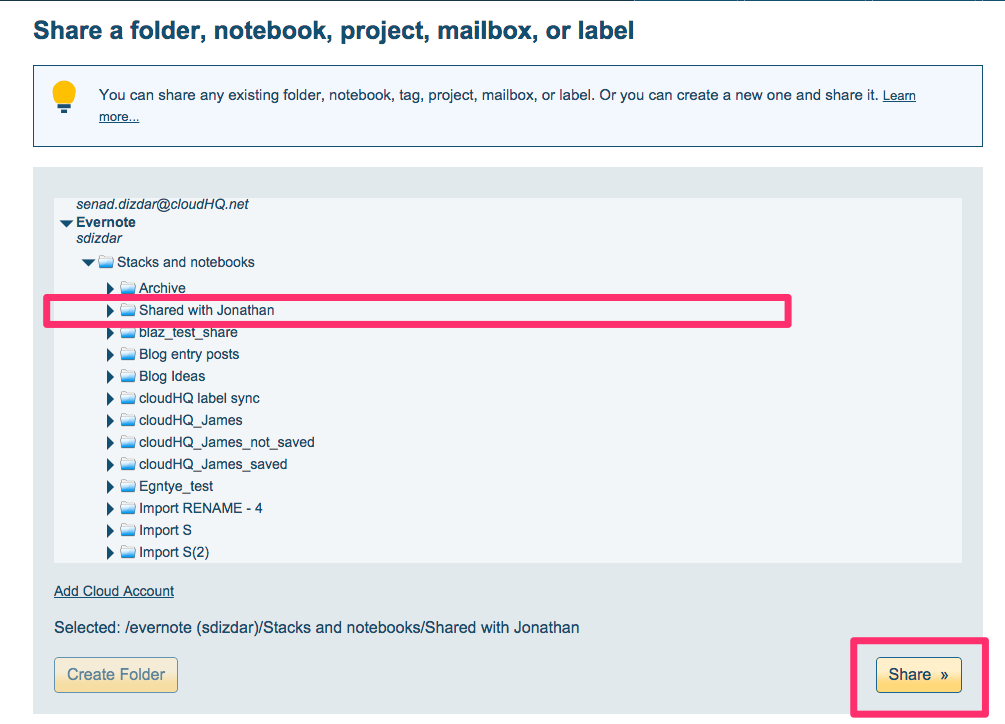
- Click on the “Create a New Share” button located on the bottom left of the screen.
- Then select “stacks and notebooks” and find the notebook you want to share (for example: “Shared with Jonathan”) and click on it.
Note: You can also create a new notebook right there in cloudHQ which will show up in your Evernote account. - Click on “Share” on the bottom right hand corner.
- You’ll be prompted to enter the person’s email address and a message if you’re so inclined.
- Click on “Share” again.
- That person that you’re sharing with will be able to open your Evernote notebook in any number of platforms of their choice, including an Evernote freemium plan.
- You can always remove sharing permissions by clicking on “remove share” in your shared directory, which is located here.
- Method three (cloudHQ read-write / editable access for collaboration):When other people are not using Evernote, but you are, you can still work with them. Follow steps above from 1-9 in “method two”. Then:
- Before you click on “Share” in step 9, check the box that says “Everyone can add/modify content (this is read-write share)”.
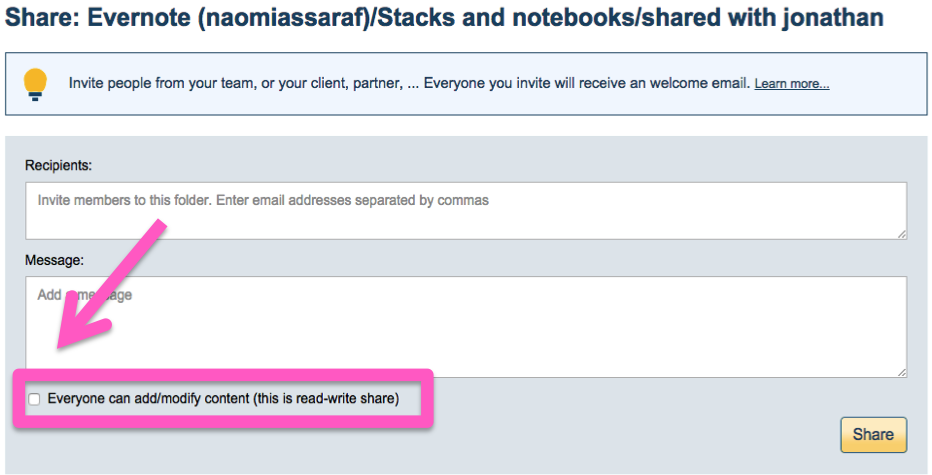
- Then click on “Share”.
- That person that you’re sharing with will be able to open, and edit, your Evernote notebook in any number of apps of their choice, including Evernote freemium, and their note will appear in your Evernote notebook automatically and in real-time.
- You can always remove sharing permissions by clicking on “remove share” in your shared directory, which is located here.
- Before you click on “Share” in step 9, check the box that says “Everyone can add/modify content (this is read-write share)”.


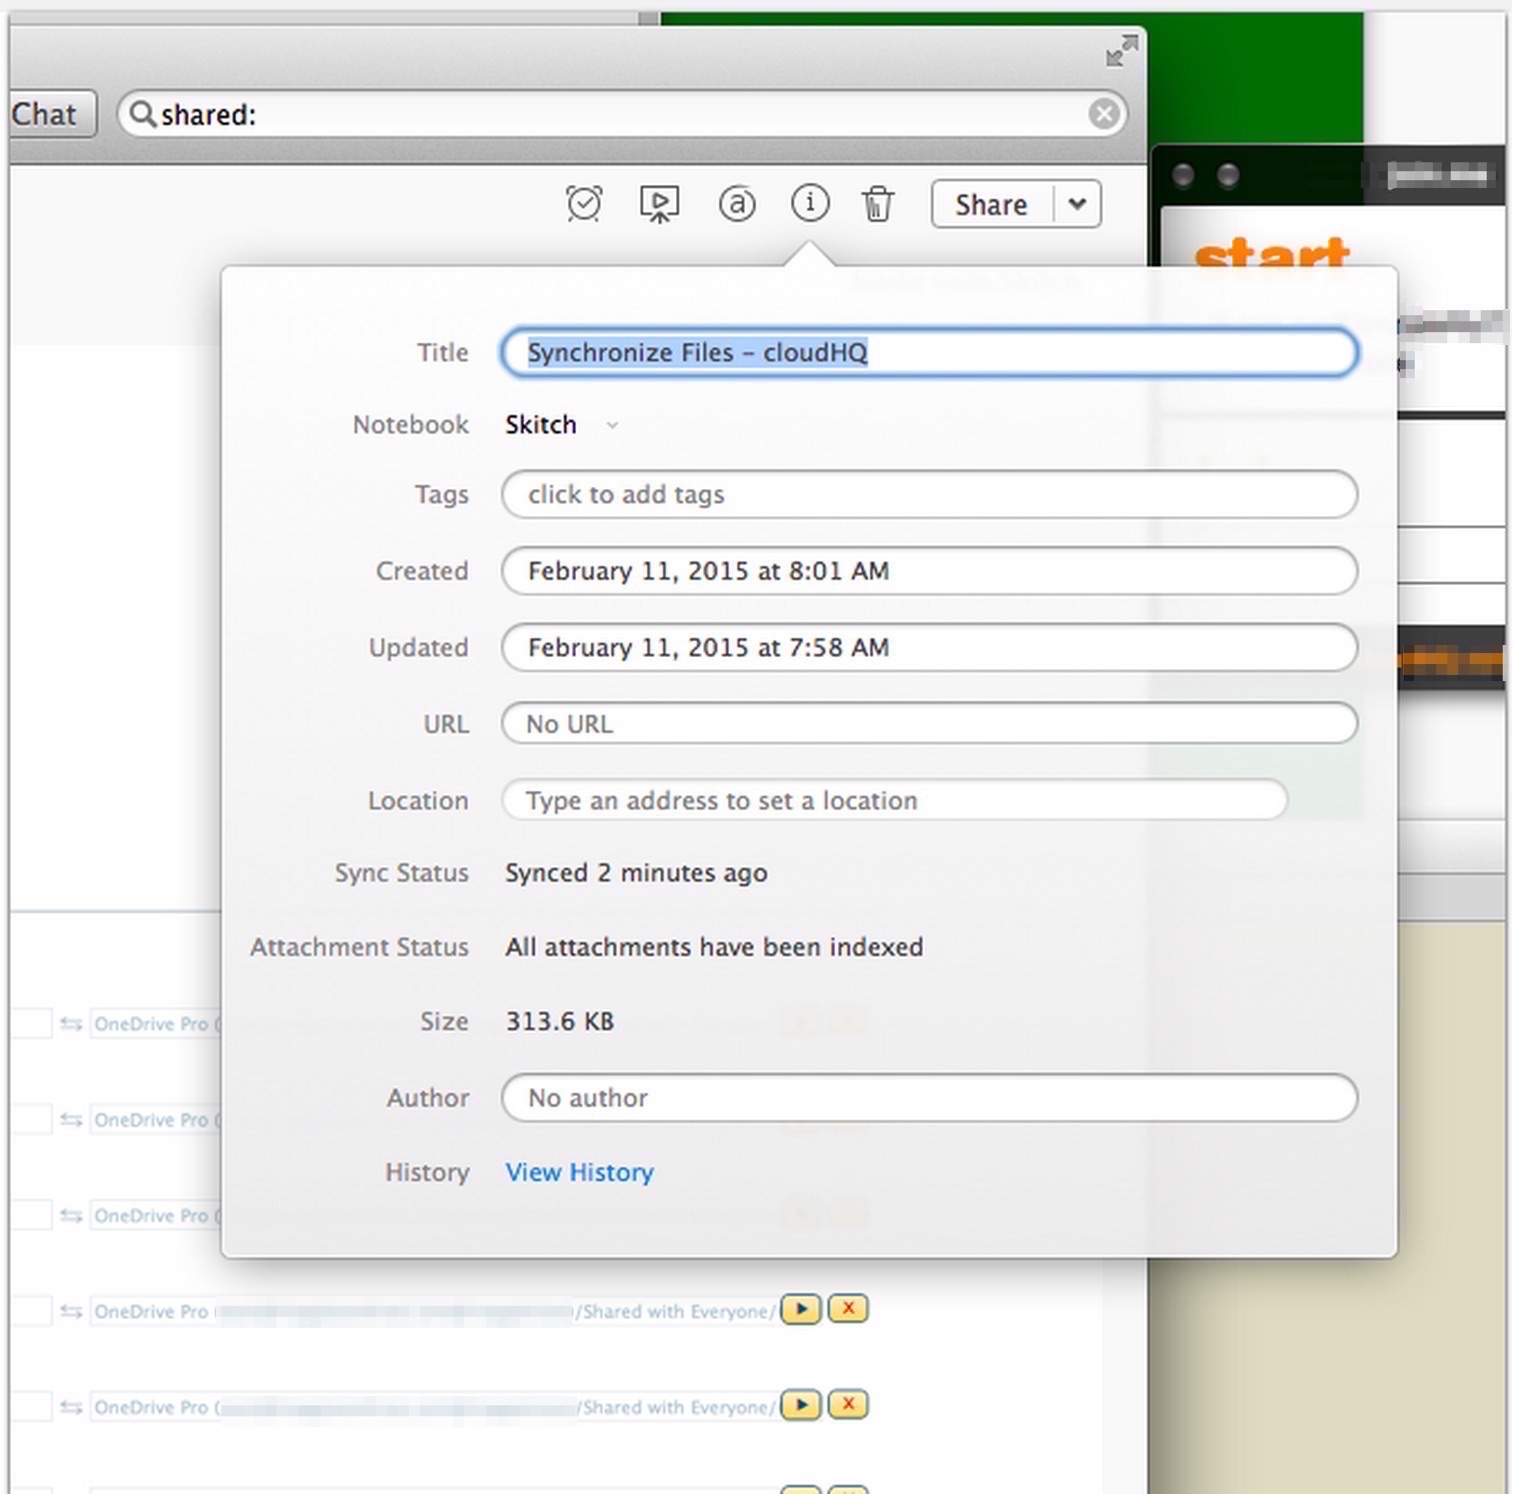
Modify update time and date of your note
Why would you modify the time and date of your note? Simple: your most recent notes will surface. Consider changing the time stamp of a note that you don’t need to view on a daily basis. By doing so, all your other, more recent notes will be listed in your search result rankings before older ones.
- Evernote Mac: Date Stamp (Shift+Command+D) or Insert a Time Stamp (Alt+Shift+Command+D) , or
- Evernote Windows: Date and Time Stamp (Control+;)
- For example, do you notice how the updated time is prior to the time created in the pic below?

Annotation (Great hack for teachers)
Why would anyone want to annotate their notes? Simple. Imagine you are a teacher and have 60 students. You could work out of Evernote, while your students can get their finished assignments over to you via Google Drive sharing. Students can put their Word documents or Google Docs documents in a shared folder and you (the teacher) can correct and annotate them via Evernote. The annotated version of PDF notes will get sync’d back to the students’ folder with your comments in a PDF format. This is a perfect solution for creating remarks.
- Create a cloudHQ sync pair between an Evernote notebook and your Google Drive folder.
- Enable option “Sync only MS Office and Google Docs documents, spreadsheets, and presentations and export them as PDF” – this means that cloudHQ will sync *only* Google Docs and MS Office Word files with your Evernote – and all these documents will be saved in Evernote as a PDF. In other words, you will have all your (and shared) Google Docs documents in your Evernote as a PDF.
- Look at this video for reference:
- Now, since all your Google Docs documents are in PDF, you can click on “Annotate a PDF” (document from Google Drive is already in PDF format in your Evernote)
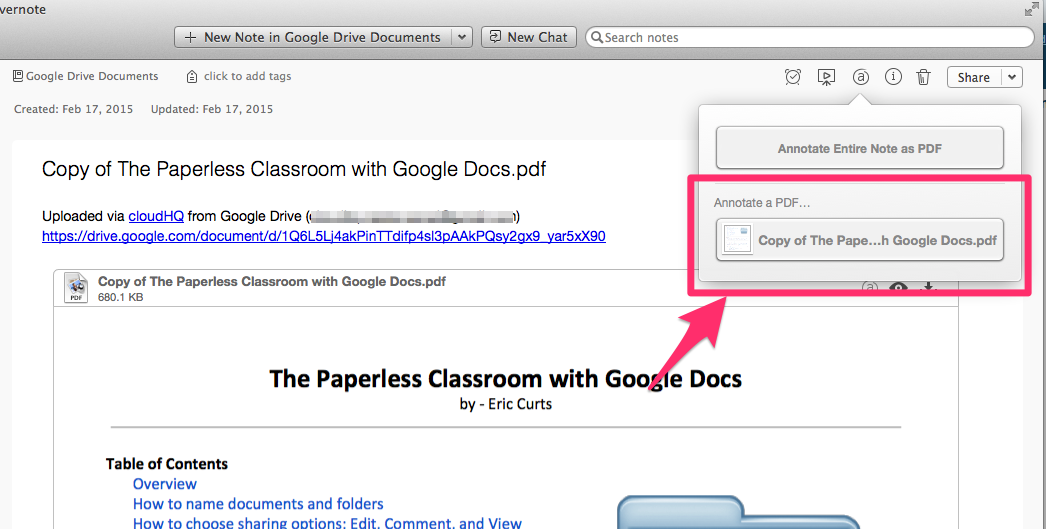
- And just annotate 🙂 ….
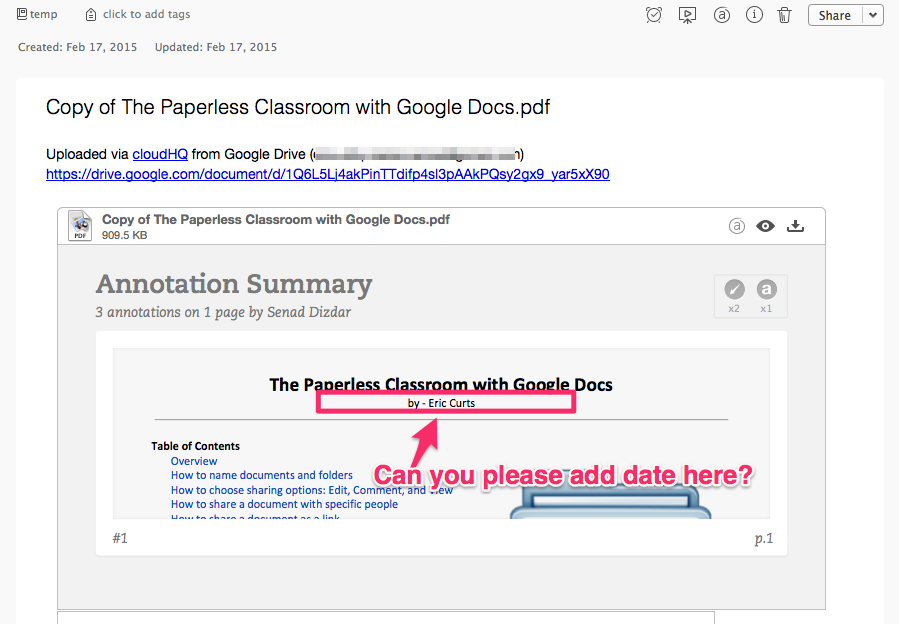
- The annotated PDF will be sync’d back to Google Drive – so your student can see your comments.


Integrate (and back up) your notebooks
Sometimes, we come across different periods of time throughout our workday where we prefer to use different platforms for different functions. While that’s completely understandable, we suggest integrating your notebooks together with your other cloud platforms. That way, you can still work on your Evernote note, which might have begun as an idea, and continue developing it in another cloud platform like Google Drive, for example. And when you go back to your Evernote note, you’ll see all your edits that you made in Google Drive. Here’s how you can do that:
- Use cloudHQ to sync from one account to the other account. Login in here.
- Then you can choose all your cloud accounts that you want synched with your Evernote notebook, but selecting your cloud accounts here.
- For each cloud account that you select, you will be prompted to authorize cloudHQ to access your cloud platforms so that we can begin your sync.
- After you’ve given cloudHQ access to your cloud platforms, go to the synchronize tab on the top (or just click here), and start setting up what you want to sync by creating your first sync pair.
- Click on the bottom on the bottom right that says Add Synchronization Pair.
- Click on “Single User Setup”.
- Click on “Integrate and sync two cloud accounts”.
- Drag and drop, or click on the accounts you want to sync. For example: Evernote in one box, and click on “select” when you see your Evernote account.
- Choose your entire account, or you can choose just a notebook, or you can even create a new one right there in cloudHQ.
- Click on “select” when you see your notebook.
- Then drag and drop (or click on) the service you want to sync Evernote with.
*NOTE: You can create a folder in your second account (i.e. shared with jonathan) - Click on “select” when you see your folder, or just choose the whole account.
- Click on “Start Sync”
We hope you enjoyed these hacks, and would love any feedback, or if you’d like to know more about other platforms that we support, we’re all ears! 🙂

