

Halloween is upon us, and if you’re looking for a fun reason to contact your clients, this is a great one to do it!
Whether you’re having a devilish sale or throwing a thrilling event, let us show you how easy it would be to create an email campaign with MailKing in just a few seconds.
MailKing is a user-friendly email marketing software system that works right out of Gmail. And one of its most useful features is its library of high-quality email templates.
Let’s take a look at this 2 minute video to see how fast you can create a Halloween email campaign:


Let’s go through each step to make sure that it’s foolproof.
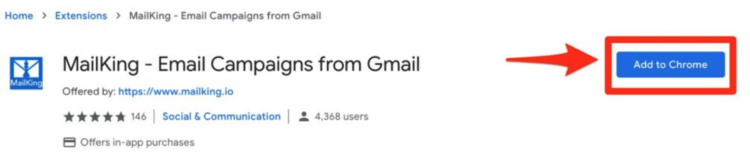
Step 1. Download MailKing
Go to the Google Chrome Store and download MailKing by clicking on the “Add to Chrome” button on the top right of your screen.

Your Gmail will refresh automatically, and you’ll be ready to get started.
Step 2. Getting Started
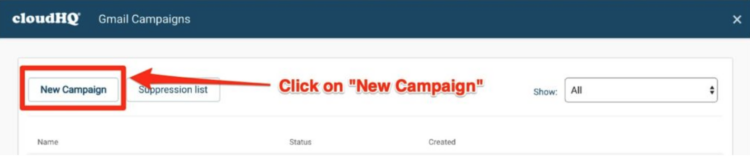
You’ll now notice a new button appear on the top-left-hand corner of your Gmail window, under Gmail’s “Compose” button. Called “Campaigns,” it will sport the MailKing logo. Click on it.


You’ll see a new cloudHQ page with a button called “New Campaign”. Click on that, and you’ll be ready to start designing your entire email.

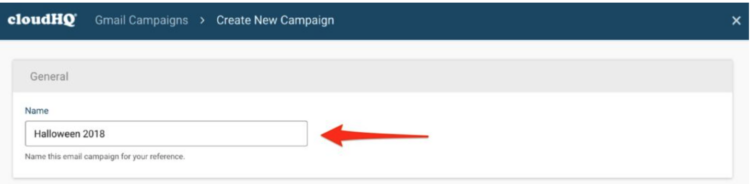
Step 3. Name Your Email
Naming your email should be a quick organizational way for you to remember what you sent, and when. I’ll name mine “Halloween 2018” so that when I look over all my campaigns in 2019, I’ll be able to know what this campaign was about.

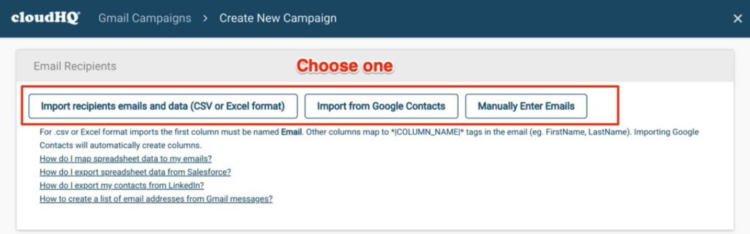
Step 4. Who Are You Sending Your Halloween Email To?
The next step is about setting up who you’re sending your email campaign to. You can either upload your recipients via XLS or CSV file, Google Contacts, or you can just manually enter in your contact recipients.
Personally, I like the first two options best because then I get to use merge tags like someone’s first name, or another feature that makes it feel more personalized, which you can’t take advantage of if you just manually include someone’s email address.

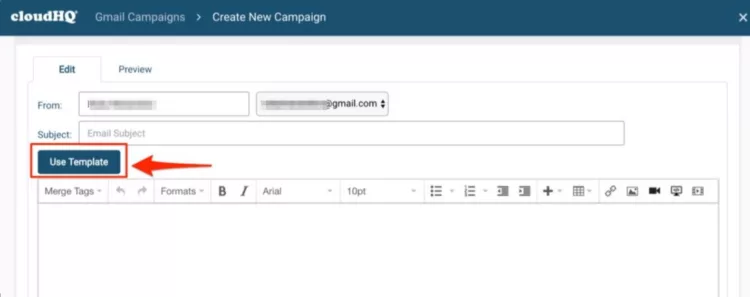
Step 5. Your Email Design
This part is by far my favorite. There’s so much I can address here, I feel like I absolutely need to break it all down:
- You can change your “From” name to anything you want. Maybe it’s your event name, your business name, whatever name it is that you want to show your email recipients, you can easily adjust right on top.
- For your email subject, you really should use something punchy like a question, an exclusive offer, or something along the lines of breaking through the noise.
- Next is “Use Template” and by gosh, this is the most fun part. If you click on that, you’ll find so many fun templates to use. And if by chance you see that we don’t have a template that you think would be really helpful, please email us and we’ll get one in the works for you!

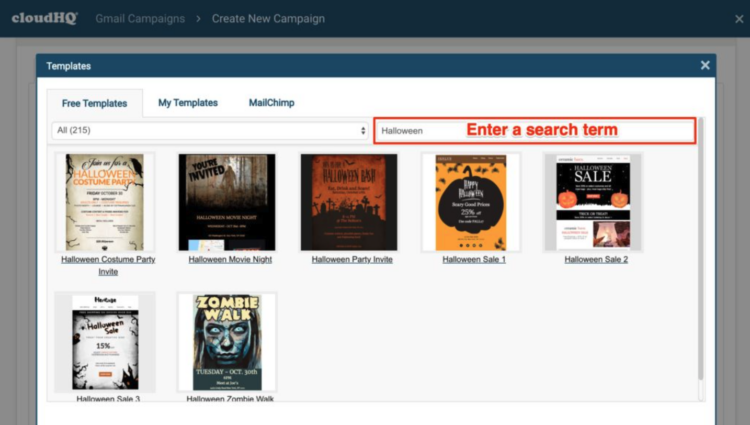
Step 6. Choose Your Email Template
You’ll see so many templates, but to keep things simple, just enter a search term on the free email templates to see what pops up. I typed “Halloween” as my search term, and I’m going to choose from any of these email templates that popped up so that I can customize it before I send it out to my email recipients.

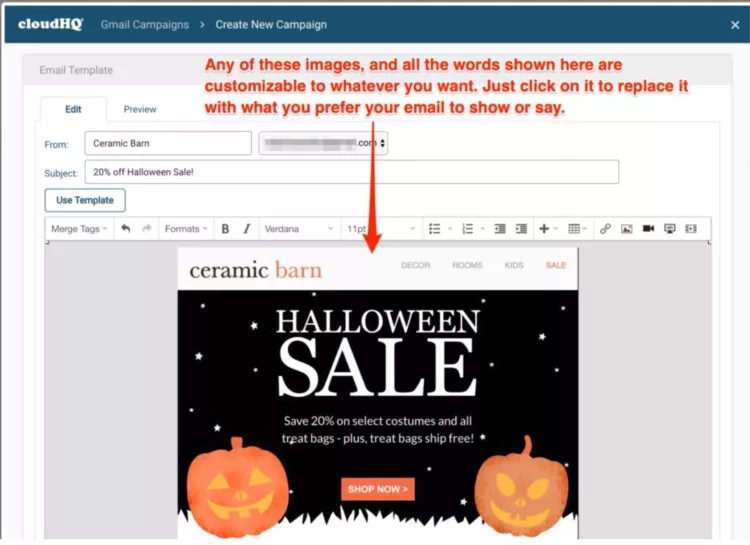
Step 7. Customize Your Email Template
Once you chose your template, you can customize it as much or as little as you want. All of the images are interchangeable for things like your own logo, or maybe even a picture of yourself-which by the way, works great if you’re a realtor or in sales.
In any case, whatever image you want to show, you can easily upload it just by clicking on the current image in the email template and replacing it. The same goes for any wording that you see and want to change, too. Maybe you want to show a sale that’s only 10% off, in which case, just click on the “20%” below, and change the wording to reflect “10%”.
I’d also suggest that you preview any emails before sending them. Near the top, and just under the “Email Template” gray line, you’ll see two tabs: “Edit” and “Preview”. Click on “Preview” to make sure everything looks perfect because sometimes, when you preview the email in a mobile format versus a web format, it helps you get an idea of what might need to change in order for you to add that special final touch.
And if you’re really wanting to change the bones of the entire email template, you can also use our built in HTML editor and play with it if you’re familiar with HTML and CSS. But have no fear if you’re not- we’ve given you over 200 high quality email templates to choose from, so it’s very likely that you’ll find one to suit your needs.

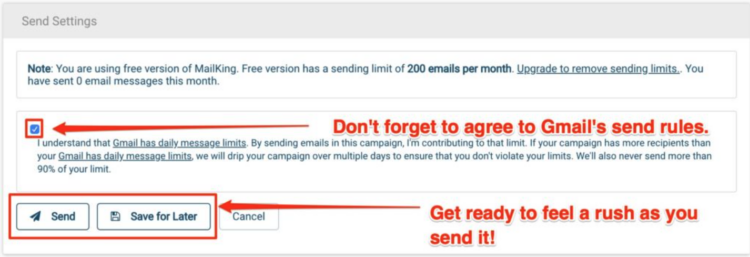
Step 8. Send!
This is the best step aside for customizing your template, because you’re done! Make sure that you check the box about understanding Gmail send limits, and then click on send!
A quick note about Gmail email sends:
We designed MailKing so that emails send directly from your email address. Google limits the number of emails that you can send from each email address to about 2,000 per day.
When you use a larger email marketing software system, your email actually goes through outside servers like Amazon, which leaves the Google ecosystem. The down side to going that route is that your emails get flagged by Gmail as “promotional”, and often only shows up in your email recipient’s “Promotional” tab.
With MailKing, we avoid that by respecting Gmail send limits, giving you the added value of making sure that your email lands in the inbox portion of your email recipients’ accounts.

MailKing is free for anyone sending up to 200 emails/month. If you need more than that, you’ll be prompted to upgrade your account for less than the cost of a kombucha and muffin at your local coffee shop.
Try MailKing today, and witness how you can create your own professional-looking Halloween email campaign in about 5 minutes!