

For those of you who already use our free Gmail Screenshot Chrome extension, we’ve got some fantastic new features to bring your screenshot game to the next level.
If you’re not familiar with the Gmail Screenshot extension, it’s an easy way to capture screenshots from the comfort of your own desktop. You won’t have to deal with confusing keyboard stroke combinations that nobody can remember, or desktops filled with stacks of screenshot images.
And no need to export to editing programs—the Gmail Screenshot extension lets you take, annotate, and send screenshots all in just a few clicks.
In its previous iteration, our Gmail Screenshot Capture was pretty spartan. You could use it to capture a selected area on your screen, but we decided to add even more functionality, including the ability to capture selected areas of your screen, your entire desktop view, specific pages in any application windows that you have open, as well as the option to delay the screenshot to capture menus when your mouse hovers over something.
Here’s a quick movie to show you everything we created for you:

These are 4 simple steps to get you started.
Step 1: Add the Gmail Screenshot Chrome extension
If you haven’t already done so, begin by adding the free Gmail Screenshot Chrome extension. It’s free from the Chrome Web Store and installs in seconds.
Step 2: Open browser window and click Gmail Screenshot icon
To access the new screenshot option features, start by clicking the target icon in the top right-hand corner of your browser:
Step 3: Select desired capture method from the list of new features
From here, a drop-down menu listing a set of new features will appear (along with some keyboard shortcuts to save even more time).
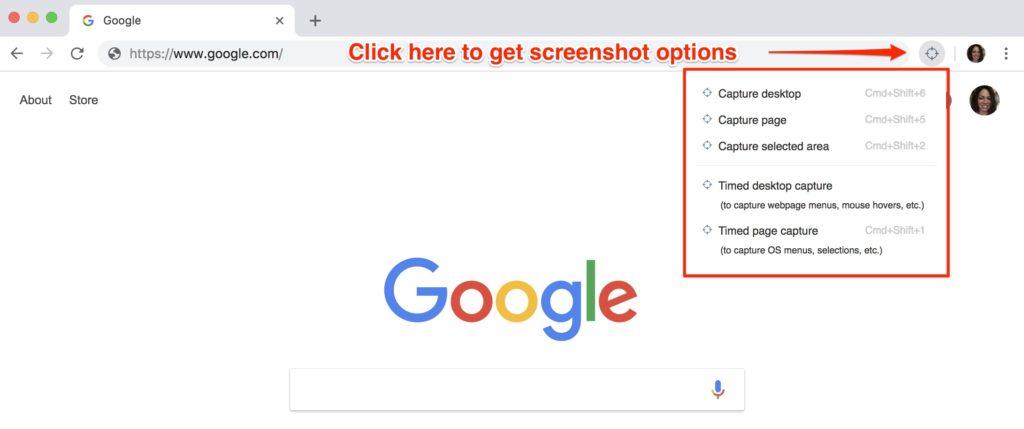

Let’s take a closer look at the 4 screenshot options that we’ve put together for you:
1. Capture Desktop
What you see is what you get—by clicking this option, you’ll be able to capture either your entire desktop.
2. Capture Page
Select this option whenever you want to capture the browser page on its own. Note that you can select any page within your Chrome browser.
3. Capture Selected Area
Just like the ‘Capture Page’ option, ‘Capture Selected Area’ will replicate the current page you’re viewing, but with a simple selection tool to screenshot a specific portion of the page. It’ll save you from having to crop it later if you only want to show something specific on your page.
4. Delayed Desktop and Page Functions
The delayed capture functions delays your screen capture for 3 seconds, which is an excellent solution to screen capture drop-down menus, or to show what happens with a mouse hover.
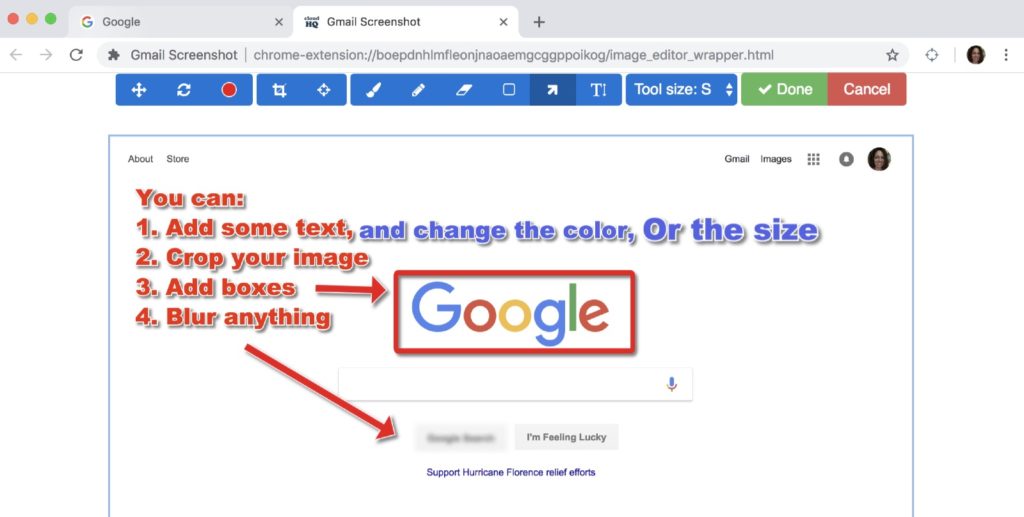
Step 4: Annotate, Crop, or blur parts of your image
Fans of the Gmail Screenshot Capture extension will recognize the preview pane. From here, users can adjust the image to suit their needs using a number of image annotation tools.
Once you’re happy with your selection, click the green button on top that says “Done” to seal the deal:

While the Gmail Screenshot extension embeds images directly into Gmail when it’s deployed from inside Gmail, you’ll also get a link of your image to copy and paste into other messaging applications. This includes: Skype, Slack, WhatsApp, Facebook Messenger, or whatever app you and your team use on a day-to-day basis.
If you like our Gmail Screenshot Capture’s new features, you’ll love some of the other free Chrome extensions available from cloudHQ.
![]()
