


You probably use a variety of cloud services in your line of work; be it Evernote, Google Drive, Dropbox, SkyDrive, Amazon S3, iCloud, Basecamp, Box, SugarSync or other cloud services. Each cloud service has its own unique functionality and can perform specific functions that differ from other cloud services. For this reason, it can be hard to maintain order and organization among thousands of files and folders. In this article, we are going to look at defining taxonomy and creating a hierarchical folder structure to keep you more organized.
Each cloud service is different
Evernote is useful for writing (or speaking) quick notes, taking photos or audio clips, setting up appointments and keeping a timeline of all aspects of projects or other events.
Dropbox is the best file-sharing service out there, as well as one of the best cloud storage services. Since there is no file size limit, files of any size can simply be dropped into a shared folder and the file will instantly be uploaded and shared with users anywhere in the world, if they have access to that folder.
Google Drive is the ultimate collaboration tool. Up to 50 users can collaborate over documents, such as company spreadsheets or proposals, and revise these files simultaneously. Google Drive also allows users to create documents using a blank sheet or by choosing one of hundreds of templates. These documents can be exported into a variety of formats including Microsoft Word.
Basecamp is one of the top project management tools around. Featuring the “single page” project management feature, users can keep all project activity, to-dos, appointments and discussions, all on a single page for easy accessibility.
File organization and taxonomy
When you use multiple cloud services, and have data stored on each of these cloud services, it can be an organizational nightmare trying to keep up with the location where certain files or documents are stored. And so the hunt is on.
But it doesn’t have to be that way, you can get better organized. Taxonomy, which is the way we organize information in the cloud, determines our level of organization and structure.
How to Organize Your Evernote Files
Step 1: Define your requirements
Before you define your taxonomy, you need to define your requirements so you an create the best solution to meet your needs. Make a list of requirements, what you want to be able to do, and how you want to do it. For instance, if you use Evernote, your list might be similar to this:
- I want the ability to search and find anything within seconds.
- Must be able to jot down notes instead of scrap paper, speech input is even better.
- I want a simplified structure so I don’t have to waste time wondering if I need to tag a note with a certain keyword. It needs to be simple enough that the decision is instantaneous.
- I want the ability to take paper documents, change them to digital format and store them online.
- Capture events (by note, photo or audio clip) and organize them by date to form a “timeline” of sorts.
That’s just a few simple requirements, your list will likely be much larger than that. You can work on each requirement until you have a satisfactory structure that allows you to complete each requirement within the allotted time frame. For instance, in Evernote, you may wish to separate your notebooks into various “stacks” for better organization and easier searching. One section could be your personal documents or home life. Another can be all documents and files relating to your company or work life such as notes on meetings, appointments, emails and more. Hobbies, kids, differing areas of work- You can make stacks for any topic that relates to your life in order to better organize it.
Here are a couple of additional tips that can help when organizing Evernote.
Tag carefully
When you tag a note, be sure to use keywords specifically related to the note and make sure you cover all keywords that you may think of down the road when you might need to search for it. You won’t always be able to remember file names, but keywords can help immensely. If you are looking for your famous, but elusive, recipe for chicken casserole, you may not remember that you named it something like chickcass001. But if you tagged it with keywords such as “chicken,” “casserole” and “recipe,” you should have no trouble finding it with a simple search.
Change your “create date” when necessary
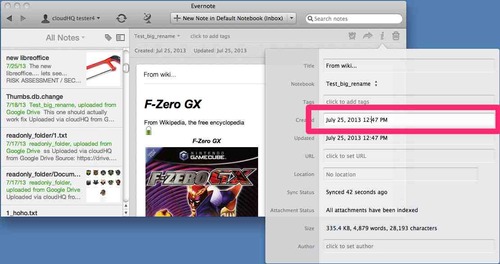
Evernote offers the ability to change the create date attribute on files, so if you scan a business document on August 18, but the document was created on August 10, you can change the create date to August 10 so it matches the document. This is extremely helpful when you want to search for documents by date created, and it also helps you keep your “timeline” more accurate. For instance, if you add photos of the company celebratory luncheon form last Friday, you may want to change the create date to more accurately represent the date the photos were taken. To change note’s create date click on “info” icon in upper left corner and enter your date:

Dropbox and Google Drive folder hierarchy
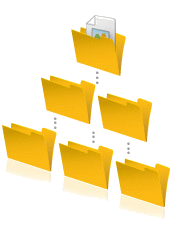
Okay, we covered taxonomy for Evernote, but what about Dropbox, Google Drive or other cloud services that use a folder structure similar to Windows? For these cloud services you will need to create a hierarchical folder structure for simple searching and organization.
Think about Dropbox as a floor-to-ceiling stack of (neatly organized) filing cabinets in your office (while Evernote is more like storage for sticky notes posted all over your desk). So you have to organize your data accordingly.
Create a template for your folder structure
Create a folder complete with subfolders which you can use as a template for other organized folders. So you can paste the entire folder structure into new folders instead of having to create a whole new set every time you need to create a new set of subfolders.
Determine direction of your folder structure
Do you create a “Projects” folder and then make a subfolder named “2013?” Or do you create a folder named “2013” and create a subfolder named “Projects” inside of this folder? This is part of your structure that you must determine based on your company needs and desires.
Use correct folder names
Many users like to place a special character (such as underscore or dash) at the front of a folder name to push this folder to the top of the list when sorted alphabetically. The problem with this is that other users may have trouble finding a folder named “_Events” when they are searching for a folder named “Events.” You can also use keywords in folder and file names for simple searching.
Get it right
If your current hierarchical folder structure is too disorganized, re-do it until you get it right. The organization and simple searching will vastly improve your efficiency and will help satisfy the requirements you have.
Sync your clouds for increased efficiency and data protection
Okay, you have a great folder structure system in place, but you still have files spread all over the place in a variety of cloud services. Wouldn’t it be great if all your files could be easily searched and accessed from one centralized account? This is where cloudHQ comes into play. CloudHQ provides synchronization from one cloud service to another. So all your notes and documents that you have stored in Evernote can be synced to Dropbox or another cloud storage service. The Evernote notes can even be exported in Microsoft Word format or PDF. Perhaps you just use Google Drive for documents that you and colleagues or coworkers collaborate on. These files can be synced to Dropbox or other cloud storage services as well.
CloudHQ syncs what you want it to sync. If you only want certain folders and files synced, you can do so, or if you just want everything backed up, that will be done. And cloudHQ keeps your folder structure, so you can have all your files from all these different cloud services neatly organized in one centralized cloud service for easy accessibility and simple searching.
How to set up cloudHQ with Evernote, Google Drive and Dropbox
For detailed setup instructions, please refer to our detailed guide. The best type of sync setup would be as follows:
- To sync Evernote to Google Drive, create a folder in Google Drive and name it “Evernote” or something similar. Then go to the cloudHQ sync wizard and create a two-way sync such as ‘Evernote/Stacks and Folders <-> Google Drive/Evernote’. Here is our video showing how to do this: https://www.youtube.com/watch?v=RN0HkOC83bw
- Then set up the sync between Google and Dropbox so you will have everything in Dropbox. Here is how: https://www.youtube.com/watch?v=ONHOU1P_ayE
- And lastly, create a backup of your Gmail attachments to Dropbox such as ‘Email -> Dropbox/Email_backup’. Screencast is here: https://www.youtube.com/watch?v=s_kBBR9eEho
For increased organization, cloudHQ is adding two-way sync of email labels with Evernote, Dropbox, etc. This allows you to integrate your emails and email attachments with Evernote and Dropbox: basically you will be able to create a note in Evernote and the note will automagically appear in your Google Gmail.