

If you send screenshots in your work, you’re very familiar with the normal process:
- Print Screen on a PC (Or Command-Shift-3 on a Mac)
- Open Skitch or Photoshop if you want to annotate the image
- Navigate to the desktop or your screenshots folder
- Open the image
- Add words or arrows
- Export the image and save it again on your hard drive
- Then, open your email
- Add the image to a message as an attachment
- Then (finally), send it
That’s what? Some 20 or 30 clicks just to send a single screenshot?
Gmail Screenshot—our latest Chrome productivity extension—can do that in half the time.
Gmail Screenshot lets you take, annotate, and send screenshots. It’s all within Gmail, and it just takes a few clicks.
Here’s how it works:

Add the Gmail Screenshot Chrome Extension
To start, you’ll need to add the free Gmail Screenshot Chrome extension, which installs in seconds and is free from the Chrome Web Store.
Step 1: Open a New Message in Gmail
Open your Gmail account and click the “Compose” button to open a new email.
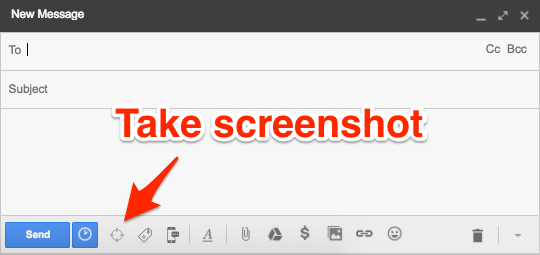
Step 2: Click the Screenshot Icon
In the bottom toolbar, click the newly added screenshot icon:

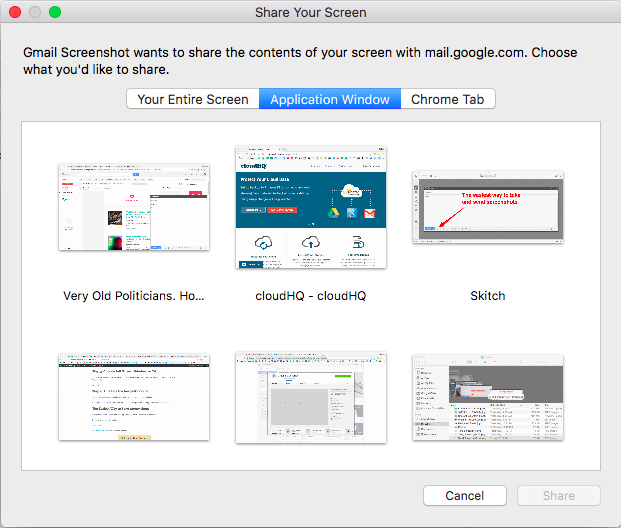
Step 3: Choose Full Screen, Window, or Tab
You have the option to take a screenshot of your entire screen, a single active window, or one of your active Chrome tabs:

Step 4: Annotate the Image (Optional)
You can add notes, arrows, or blur areas of the image. When you’re done, click “Share,” and the annotated image will instantly be inserted into your email.
The Easiest Way to Send Screenshots
Gmail Screenshot is lightweight so it doesn’t slow down your computer, and it’s free for anyone using Gmail or with an email account hosted by G Suite.
![]()
